
部署腾讯云轻量应用服务器
买了新的腾讯云轻量应用服务器,记录一下部署服务器的过程。
部署系统
我选择了部署OpenCloudOS系统。
切换shell
1 | # 查看当前shell |
最后重启终端即可。
安装tldr
安装tldr方便查询命令。
1 | sudo yum install -y tldr |
安装neofetch
安装neofetch查看系统信息。
1 | sudo yum install -y neofetch |
安装bat
安装bat替代cat:
1 | wget -c http://repo.openfusion.net/centos7-x86_64/bat-0.7.0-1.of.el7.x86_64.rpm |
安装Git
1 | sudo yum install -y git |
安装nvm
使用国内源安装nvm:https://gitee.com/RubyMetric/nvm-cn/
1 | curl -o- https://gitee.com/RubyMetric/nvm-cn/raw/main/install.sh | bash |
npm换源:https://gitee.com/RubyMetric/chsrc
nvm安装nodejs
nvm命令:
1 | # 查看已安装的nodejs |
这里安装了20的LTS版本:
1 | nvm install v20.13.1 |
安装cnpm:https://npmmirror.com/
1 | npm install -g cnpm --registry=https://registry.npmmirror.com |
安装PM2
PM2: https://pm2.keymetrics.io/
1 | # 安装PM2 |
安装python
1 | # 安装3.9 |
安装nginx
1 | # 安装nginx |
编辑nginx配置文件:/etc/nginx/nginx.conf
1 | server { |
修改完配置文件后需要重新载入配置文件:
1 | sudo systemctl reload nginx |
然后浏览器打开ip就发现nginx服务启动成功了。
最后再将前端项目通过SCP、SFTP等工具上传到/www/test下即可通过ip访问到页面。
1 | scp -r /path/to/your/local/vue-app/dist username@your_server_ip:/path/to/your/server/vue-app/ |
实际开发中一般通过CI/CD将代码部署到服务器上。
安装caddy
1 | # 安装 |
安装htop
1 | sudo yum install -y htop |
配置防火墙规则
这里配置了常用的规则。
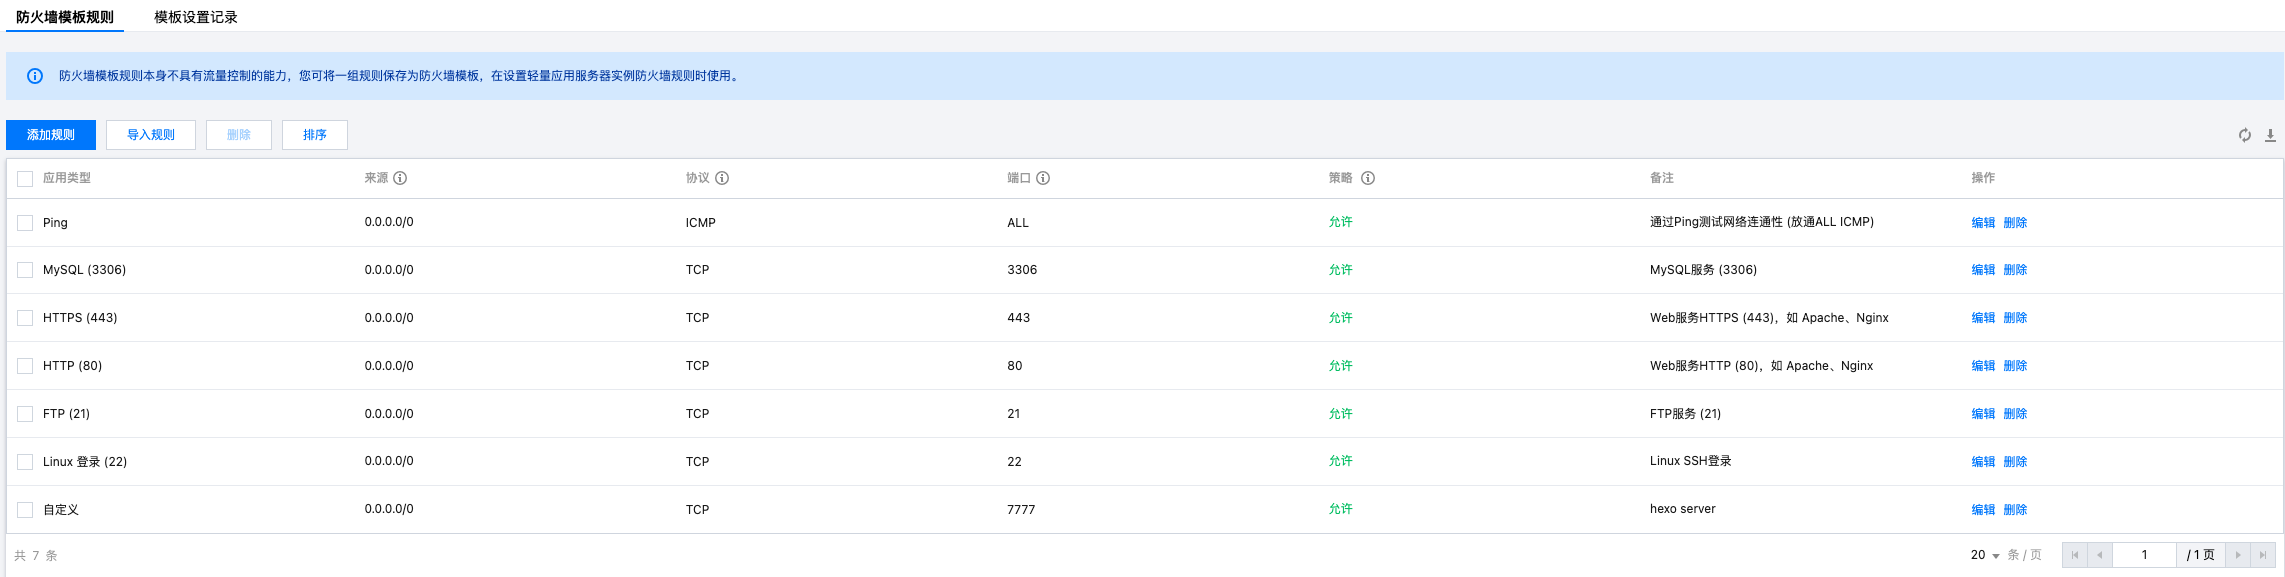
然后设置服务器实例套用规则。
安装mysql-server
1 | # 安装server |
安全安装向导:
Securing the MySQL server deployment.

Connecting to MySQL using a blank password.

VALIDATE PASSWORD COMPONENT can be used to test passwords
and improve security. It checks the strength of password
and allows the users to set only those passwords which are
secure enough. Would you like to setup VALIDATE PASSWORD component?

Press y|Y for Yes, any other key for No: y  #是否安装密码强度验证组件

There are three levels of password validation policy:

LOW    Length >= 8
MEDIUM Length >= 8, numeric, mixed case, and special characters
STRONG Length >= 8, numeric, mixed case, special characters and dictionary                  file

Please enter 0 = LOW, 1 = MEDIUM and 2 = STRONG: 2 #选择密码强度 ##上面选择不安装密码强度验证组件布显示这个
Please set the password for root here.

New password:   #设置root密码

Re-enter new password:  #确认root密码

Estimated strength of the password: 90
Do you wish to continue with the password provided?(Press y|Y for Yes, any other key for No) : y  #是否确定使用上面的密码
By default, a MySQL installation has an anonymous user,
allowing anyone to log into MySQL without having to have
a user account created for them. This is intended only for
testing, and to make the installation go a bit smoother.
You should remove them before moving into a production
environment.

Remove anonymous users? (Press y|Y for Yes, any other key for No) : y  #是否删除匿名用户?
Success.


Normally, root should only be allowed to connect from
'localhost'. This ensures that someone cannot guess at
the root password from the network.

Disallow root login remotely? (Press y|Y for Yes, any other key for No) : n #是否禁止root远程登录

... skipping.
By default, MySQL comes with a database named 'test' that
anyone can access. This is also intended only for testing,
and should be removed before moving into a production
environment.


Remove test database and access to it? (Press y|Y for Yes, any other key for No) : y #是否删除test数据库
- Dropping test database...
Success.

- Removing privileges on test database...
Success.

Reloading the privilege tables will ensure that all changes
made so far will take effect immediately.

Reload privilege tables now? (Press y|Y for Yes, any other key for No) : y #是否现在重新加载特权表
Success.

All done!
mysql基本操作:
1 | # 列出所有的数据库 |
安装java
1 | # 安装jdk |
安装Docker
1 | # 卸载已存在的docker |
购买域名
购买域名后添加DNS解析记录:

域名备案要提交的材料越来越多,各种实名认证、签署各种承诺书、还需要录制承诺视频。
妈的实在是太恶心了。